Monday, December 31, 2012

At the night watch service at Lighthouse Baptist Church

with Princess Ashley.

Girl's Jewelry Box

Today I scored this like-new girl's jewelry box for my youngest.


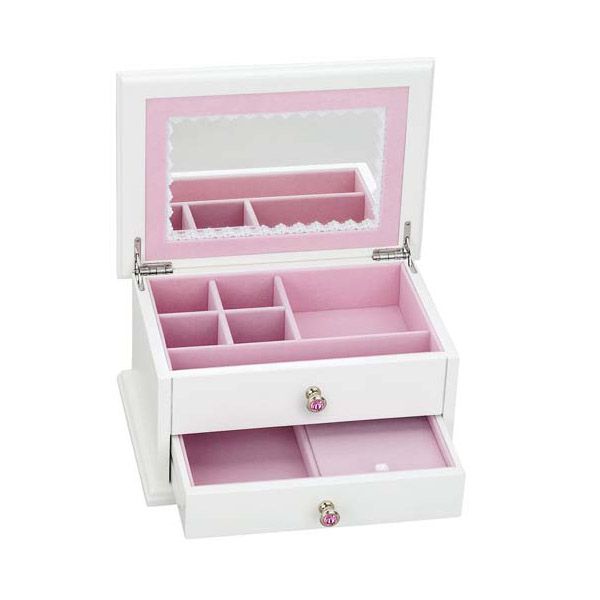
Inside has blue flocking lining the compartments and a mirror on the lid.

I think it's a Kohl's brand box. But, it's not on the Kohl's website. The closest comparable in style I found was this
Reed and Barton Secret Princess Jewelry Box for Girls
by Reed and Barton for sale at the Silver Superstore. Most of the girl's jewelry boxes are musical ones with a ballerina that twirls once you open the lid.

I know Kohl's is not comparable in quality to Reed and Barton. Having said that, the Reed and Barton jewelry box retails for $49.95. My thrift store find cost $2.95 (originally $3.93 - 25% sale).

Sunday, December 30, 2012

Starting To Declutter The Linen Closet


I wanted to declutter and organize my linen closet. It stores a lot more than just linens. My grooming supplies and medicines are also in there and it's all a big mess. There are 6 shelves, counting the floor as a shelf too. Here are the before pictures.

Top shelves
Middle shelves

Bottom shelves and floor

I had some order at one time. I organized similar items into white, plastic bins and labeled them with tags. You can see this on the middle shelf.

I decided to start with the middle shelves. I wanted to use the bamboo stacking bins I bought from the thrift store and this clear box which fit 3 coordinating bins inside perfectly. I bought these from the Container Store although I wasn't sure how I was going to use them. This turned out to work.


Oooh, I love the Container Store. If I worked there, I wouldn't take home a paycheck. It would go right back to the store as I would spend all of my money there. Having said that, I try NOT to go there often. I try to snag things at the thrift store to save me $$. Then, if I have a particularly challenging organizational problem I'll go to the Container Store. They have EVERYTHING needed to organize EVERYTHING.

I started going through my over-the-counter medicines which were in a clear Rubbermaid container. I misplaced the top so it stays open like this.


I got rid of all of the expired meds and those which will be expiring in January 2013, some of which weren't even opened.  I have a lot of duplicates, no doubt because I couldn't find a bottle so I bought another one. These are some of the expired items below.


I also had first aid meds in this repurposed tool box. I put this box together a couple of years ago to use when I took my youngest daughter and two of her friends camping. The empty tool box will now be donated.

I organized the medicines by types of remedies such as pain relief, cold and allergy, first aid, etc. and put them in these bins by type.


Then I placed the bins, side-by-side, into the clear container.

Using a china marker, I wrote the expiration date on top of or around the next of bottles and on the sides of boxes. This will make it easier for me to see when something is expired and should be trashed. Quite a few meds will be trashed soon because they're expiring in February and March 2013.


I would save space if I got rid of packaging. But, I find that sometimes the packages have important information which isn't always on the bottle. I still have a lot of duplicates (like pain relievers) which I'll bring to work to keep at my desk or give to friends or family members.

Although it doesn't look like it, it's MUCH better than the jumbled mess before. The left inner bin contains cold and allergy meds, with a lot of duplicates. The middle bin has pain relievers, with a lot of duplicates. The right bin has first aid and miscellaneous items.


Next, I tackled my manicure, pedicure, and makeup items. This is how they looked before on the shelves.


I went through and got rid of old and broken items.Then I organized the remaining stuff (which was still a lot) by nail care, foot care, and face. I was excited to be able to use my "new" bamboo boxes.
The left bin has my foot care stuff. Again, I have way too much and lots of duplicates. I guess I need to start giving myself pedicures to use this up. The right bin has my nail polishes, clippers, and related stuff.
Here are my cosmetics. I reused the tea cup and the small tin barrel (in front) which were holding other items before.

I got the idea from BHG.com to use my scrapbook supplies to make labels for the front of the bins. I had this green and white polka dot chipboard letters for years. I got them from the dollar spot at Target. Finally, I'm using it and I like the result. I had to piece together several letters to make the "f" in foot. It's hard to tell from this picture.


The medicines went on the shelf below along with other items I organized. Again, I used chipboard letters to label the front of the medicine box. I need to decide how to label the other two boxes next to it. I might break out my Cricut or dies to make labels for those boxes. 

The wooden box to the right of the medicine container has rubbing alcohol (3 bottles!), hydrogen peroxide, witch hazel. I also bought this box from the thrift store for .95, which was on sale for half off of the regular price of $1.91. It was originally a wine box that contained poinsettias as a gift. However, it was empty when I bought it. Isn't it cute? I'm not sure what to label this box.

The box to the right of the wine box is one of the stacking bamboo boxes. It contains lotions and other skin care items and will be labeled "skin".

Okay, one more time. Here is the before and after:


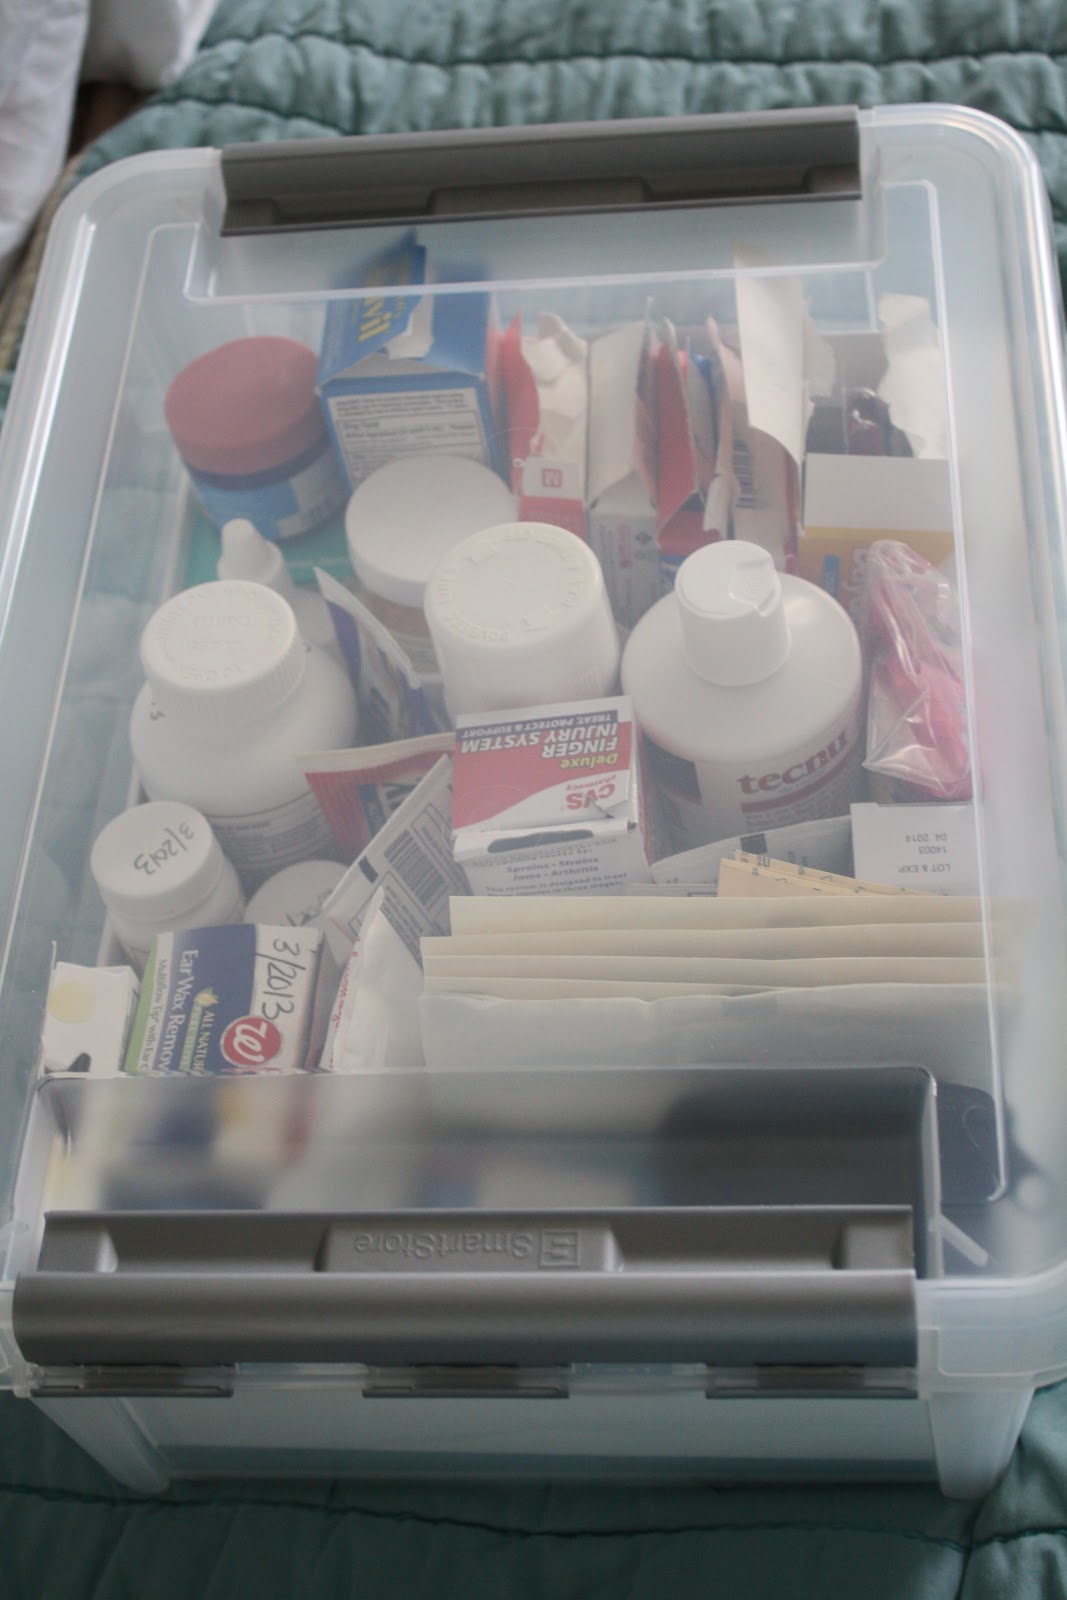
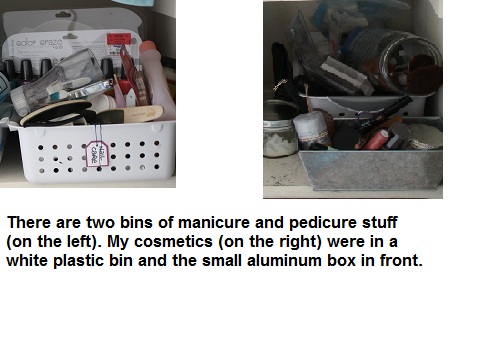
Before -- On the left picture are toiletries and a portable radio from the top shelf, two bins of nail and foot care on the right of the middle shelf, and all of the items on the next shelf below. On the right picture, the first aid kit in a tool box from the floor level. You can't see the tool box first aid kit because it's behind the mess on the floor.
After --  Items from four shelves are now place neatly onto two shelves. I still need to label the last two boxes (right).

Yay! Two shelves down, four more to go.


Friday, December 28, 2012

Painted Tables

Recently, I bought two tables at the thrift store. One is a dining table. The other is an end table. Both are solid wood. I want to paint both of them. But, I'm torn as to what design approach to use. Do I want something a colorful like this?
Or, do I want something a little less colorful like this?


How about something a little folksy like Mexican tiles?

Hand painted talavera tile restaurant table top

Or maybe something a little more ornate?

11-11-moorish-pb-1.jpg

I kinda like these Moroccan designs:


 Okay, I think I've decided on the end table. I'll go with something colorful like the Moroccan or Indian designs (though I like the Mexican tile look too). Colorful it'll be. Now, I've got to decide on the design.

Stacking Bamboo Storage Containers and More

I went on another thrift store run. I scored some great deals like these stacking bamboo storage containers.
Four 15" x 6" stacking bamboo storage boxes


I bought two 12" x 6" bamboo boxes which were selling for $3.93 for a set of two. But, today they were 50% off, so it only cost me $1.96 for two. Note, that the regular retail for one of these boxes new is $7.99 ($15.98 for two). I saved $14.02 or about 88%!

Next, I bought four 15" x 6" stacking bamboo boxes for $3.46, regularly $6.92 before the 50% off sale. These retail for $9.99 each, if new. I saved $36.50 or nearly 91%!

 Finally, on a different thrift store excursion I bought this drawer knife block.


I had this Wolfgang Puck knife block set (below) which sat on the counter.


 I want to clear off my counters so I bought the drawer block (shown above). The drawer block was still in the original packaging. It sells for $22.79 at Target. I bought it for $3.93 at the thrift store, saving me $18.86 or over 83% off new retail.

Oh, I love finding deals at the thrift store. I'll post more finds soon.

Thursday, December 27, 2012

The Island Pantry Is Finished

My island pantry is now organized. Yay!  I wanted to organize and label the shelves and bins by food use (breakfast, baking, snacks, etc.) but that didn't work. Maybe after using this new system for a bit, a different arrangement may come to mind.

The island has a 11" deep shelf that extends the entire 4' length. I'm able to put a small cracker jar (which is 32 ounces) in front of a large one (64 ounces). Or, two canning jars fit one in front of another. Beans, legumes, grains, flours, salts, sugars, baking soda, and breakfast items are on the top shelf.

Here are the labelled jars that I wrote about here. These jars take up about 2/3 of the top shelf.


Beans and legumes are in canning jars on the left. These jars are too small to use the pocket labels which are shown above.

The bottom shelf is 2 feet deep. A lot of items used to get lost in the back. I bought two sliding bins which fit the entire depth and can be pulled all of the way out. Smaller bins can stack on top of the sliding bins to maximize storage space.

On the bottom shelf are my tall glass jars of pasta (on the left), the two sets of stacking and sliding bin combos, some single bins, and a couple of lazy susans. 


The lazy susans fit my cans and odd items.

I haven't been shopping for canned goods in a while so I'm not sure how this new arrangement will work when I do stock up on canned goods. I may have to add a wire shelf or can dispenser if I run out of space. I'm trying to contain most of my food products in this space. But, I do have some food in an overflow area in a storage closet. I don't like using the overflow area because I forget about stuff and end up buying duplicates.

For now my pantry looks good and I feel good having finished this project. Soon I'll show you how I organized my spices.


Wednesday, December 26, 2012

Sheet of pantry labels

Here's what a full sheet of the printed labels look like using the business card paper. The nice thing about using this paper is that it's pre-perforated for easy separation and it's the perfect size for these pockets.

Organizing My Pantry

I decided to tackle my chaotic pantry. I was inspired by the gorgeous pantries on the internet such as this
At Whisk Together blog
and this
At Malka in The Pantry blog
or this
At Healthy Girl's Kitchen blog.


But, the reality of my kitchen is similar to this:


A 2' deep by 4' 8" wide, builder's grade kitchen island in a rental property which serves as my pantry. I have a few overflow items in a storage closet and spices in separate drawers. But, most of my food is stored in the island.

I had started to convert my storage to glass jars a few years back. I hate plastic. So, I had a mix of glass jars and store packaging inside my island pantry. There was not much order or system as to how I placed items in there. Many of the lesser used items got pushed in the back and haven't seen daylight in months.

I started by taking a section out, sorting through things, trashing a lot and deciding what to put in glass jars. I opted to use two types of jars.  These Anchor Hocking Cracker jars:

Anchor Hocking Glass Cracker Jars

and canning jars like this

Canning Jars - Ball & Kerr Glass Jars

and this

Wire Bale Air-Seal Glass Jars.
In the past, I used labels made from my Brother P-Touch label maker -- which I loved! My model is similar to this one. But I think the one I own has been discontinued.

Brother PT-1880C


Unfortunately, I ran into problems when I changed contents. I frequently peeled off labels and created new labels to match the contents. That was too labor and material intensive.

Then I found these little chalkboard label beauties at Staples.

Martha Stewart Home Office with Avery Chalkboard Labels, Flourish, 2-1/2
Oh, I was overjoyed! I bought a pack and immediately tried them out on my glass jars. First, they only fit on the largest jars as is. For the medium and small jars, I had to cut the label in 1/2 to use. I didn't mind that as this would increase the number of labels I could use. But, I ran into a problem. The chalk writing doesn't stay on. It smears and eventually rubs off. How come my labels don't look pretty and neat AND stay on like in the pictures? Am I the only one who actually touches the labels when handling the jars?

This was frustrating. I read that there were chalk markers somewhere. But, where? I looked in Staples, Michael's, Walmart, Target, A.C. Moore. I could only found them on the internet. I wanted a solution NOW.

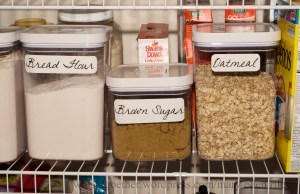
While looking for other pantry organizing tools, I stumbled upon this.
\

 It's a clear, plastic pocket with strong adhesive on back. You can insert and remove labels in the pocket with ease. 
The package says, "Works in hot, cold and humid conditions...Sticks to all materials: bins, baskets, boxes and freezer containers...Make your own inserts...Change the insert anytime!" This sounds perfect. There were several sizes. I picked up the smallest size which was 2 1/4" x 4".

This size pocket also fits a business card. It happened to be that I had these at home which I could use to make the insert labels.

Staples Laser Business Cards


Decisions, decisions. I had to decide what font to use to print the labels. I wanted something legible for these old eyes. But, I also wanted something a bit fancier than Arial. So, I settled with Goudy Stout font in 20 point size. I would post a picture of it here but my computer is acting stupid right now.

I love the results. I'm off to peel and stick the rest of my labels onto the jars and I'll post pictures separately. (That's the only way my pictures seem to post.) Please let me know what you think.